Apple has long been known for its commitment to user safety, and one of its most valuable features, Check In, has now made its way to the Apple Watch via watchOS 11. Originally introduced on iPhones with the iOS 17 update, the Check In feature is designed to help users stay connected with loved ones and provide real-time updates on their whereabouts. Whether you’re venturing on a solo hike, running errands, or simply want peace of mind, the Check In feature allows you to notify trusted contacts if something goes wrong or if you don’t arrive at your destination as expected.
While the Check In feature has been available on iPhones for some time, its recent addition to the Apple Watch opens up more seamless functionality for users who are always on the go. However, finding and setting up the feature on your watch may seem a little tricky, as it’s nestled within the Messages app. In this guide, I will walk you through the steps to easily enable and use the Check In feature on your Apple Watch with watchOS 11.
Step 1: Install watchOS 11
Before you can take advantage of this safety feature, you’ll need to ensure that your Apple Watch is updated to the latest version of watchOS. This feature is only available on watchOS 11 and newer versions, so if your device is still running an older version, you’ll need to install the update.
Compatible devices include the Apple Watch Series 6 and newer, Apple Watch SE 2022, and the Apple Watch Ultra models. To install watchOS 11, make sure your Apple Watch has at least 50% battery life. The installation process can take about an hour, so it’s best to do it when you have some downtime.

Step 2: Open the Messages App
Once your Apple Watch is up to date, you’re ready to access the Check In feature. First, open the Messages app on your watch. To start using Check In, you’ll need to begin by creating a new message. You can send a Check In notification to just one contact or multiple trusted contacts at once.
Step 3: Access the Check In Feature
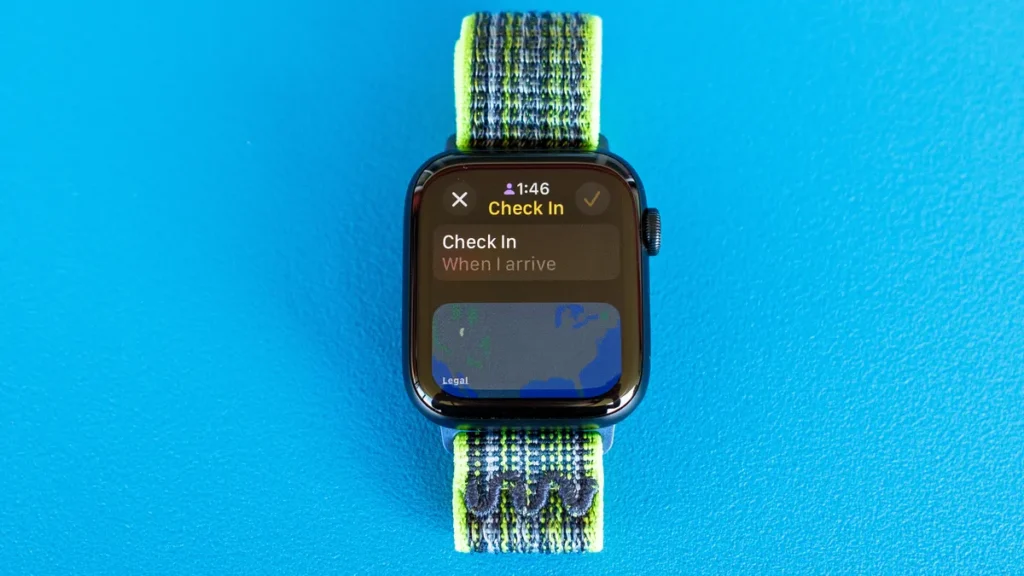
After creating a new message, you will see a “+” symbol at the bottom of the screen, which is used to add additional features to the message. Tap the “+” sign, scroll down through the options, and select “Check In.” This is where you will customize how you want to notify your contacts.
Step 4: Choose How to Check In
One of the best aspects of Apple’s Check In feature is that it offers three different methods for how you can keep your contacts informed. You can Check In based on your destination, set a timer, or tie it to the completion of a workout. Here’s how each option works:
- Arrival-based Check In: This option allows your contacts to be notified when you reach a specific destination. The Apple Watch uses its GPS to track your location, and once you arrive safely, your contacts will automatically be informed.
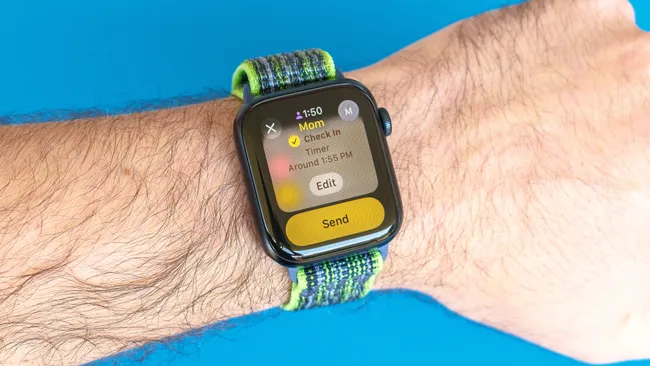
- Time-based Check In: If you prefer to base your Check In on time rather than location, you can set a timer. When the timer expires, you will receive a notification to Check In. If you don’t respond within a designated time frame, your contacts will be alerted, and your location data will be sent to them.
- Workout-based Check In: For fitness enthusiasts who love to exercise outdoors, this option is particularly useful. When you start a workout session (such as running, hiking, or biking) via the Workout app, your contacts will be notified when the activity is completed, confirming that you’ve made it home or finished your session safely.

Step 5: Customize the Details
Once you’ve chosen your preferred Check In method, you can adjust the details to suit your needs. If you’re checking in via arrival, you’ll need to select a destination by searching for a location or choosing a saved one. After confirming your choice, the watch will automatically track your progress toward that destination.
For time-based Check Ins, you can set the timer to expire anywhere from five minutes to eight hours. Simply scroll through the time options, select the duration that works best for you, and hit “Done” to confirm.
If you’re using the workout-based Check In, you will need to start the workout session in the Workout app. After selecting your exercise, navigate left and scroll down to choose Check In. This ensures that your contacts are notified as soon as you finish the activity.
Step 6: Send the Check In Notification
Once you’ve configured the settings to your liking, the final step is to send the Check In notification. Tap “Send,” and your Apple Watch will handle the rest. Your contacts will receive a notification with all the necessary information, including your location and the type of Check In you’ve selected.
This is especially helpful for those times when you’re venturing out alone or in unfamiliar areas. It provides a safety net by ensuring someone knows where you are and that you’re safe.
Step 7: Cancel or Modify Your Check In
If your plans change or you complete your journey earlier than expected, you can easily cancel or modify your Check In. To do so, go back to the Messages app on your Apple Watch and select the message thread where you initiated the Check In. From there, tap on “Details” and scroll down to find the “Cancel Check In” option. Confirm your choice, and your contacts will be notified that the Check In has been terminated.
Additionally, if you need to extend the time or change your destination, you can edit your Check In in the same way. This flexibility ensures that the feature adapts to your needs and changes throughout your day.
Why Use Check In?
The Check In feature is a powerful tool for those who prioritize safety, whether you’re going on a solo adventure, meeting new people, or just want to give your loved ones peace of mind. With three customizable Check In methods and the ability to edit or cancel at any time, the feature is versatile enough to fit a variety of situations.
This feature is especially helpful in scenarios where safety might be a concern, such as walking alone at night, meeting someone for the first time, or participating in outdoor activities.
Apple’s Check In feature is an excellent addition to the Apple Watch’s arsenal of safety features. By integrating it into watchOS 11, Apple has made it easier than ever for users to stay connected with trusted contacts while ensuring their well-being. With options for location-based, time-based, and workout-based Check Ins, users can customize the feature to their specific needs and cancel or modify it whenever plans change.
If you haven’t already, now is a great time to explore all the new features offered in watchOS 11, including Check-In, Activity Ring pausing, and more. Apple continues to push the envelope when it comes to user safety, and the Check-In feature is a testament to that.


